Now that we have seen to make MTH5 files and use Aurora, we can use a slightly different workflow using mtpy-v2.
import warnings
from pathlib import Path
from loguru import logger
import pandas as pd

from mtpy.processing import AuroraProcessing

warnings.filterwarnings("ignore")
survey_dir = Path(r"c:\Users\jpeacock\OneDrive - DOI\mt\mt_short_course\data\mth5")

edi_path = survey_dir.parent.joinpath("EDI_Files_aurora")
edi_path.mkdir(exist_ok=True)

# Or try the alternative band file
band_file = Path().cwd().parent.parent.joinpath("data", "transfer_functions", "bs_eight_level.cfg")

band_file_24k = Path(r"C:\Users\jpeacock\OneDrive - DOI\Documents\GitHub\iris-mt-course-2022\data\transfer_functions\phx_24k_bs.txt")

# this is how the different transfer functions will be merged.
merge_dict = {
    150: {"period_min": 1.0 / 30, "period_max": 10000},
    24000: {"period_min": 1.0 / 8000, "period_max": 1.0 / 31},
}
ap = AuroraProcessing(merge_dictionary=merge_dict)
ap.local_mth5_path = survey_dir.joinpath("phx_9043.h5")
ap.remote_mth5_path = survey_dir.joinpath("phx_1003.h5")
ap.local_station_id = "9043"
ap.remote_station_id = "1003"
ap.run_summary = ap.get_run_summary()2024-11-08T14:18:27.958028-0800 | INFO | mth5.mth5 | close_mth5 | Flushing and closing c:\Users\jpeacock\OneDrive - DOI\mt\mt_short_course\data\mth5\phx_9043.h5
2024-11-08T14:18:30.491775-0800 | INFO | mth5.mth5 | close_mth5 | Flushing and closing c:\Users\jpeacock\OneDrive - DOI\mt\mt_short_course\data\mth5\phx_1003.h5
ap.run_summary.mini_summaryCreate Processing Objects
There are a few unique things with this data set that we need to take into account when processing.
The remote only has data for 150 samples/second and not 24k, therefore we need to account for that in the
KernelDatasetThese data use a different nomenclature than the default. Instead of [“ex”, “ey”, “hx”, “hy”, “hz”] the data uses [“e1”, “e2”, “h1”, “h2”, “h3”]. We can change this in the
Configobject.
Internally in AuroraProcessing the windowing parameters are adjusted based on the sample rate, but we will demonstrate how you might change the windowing and any other parameters in the decimations of the Config object.
24k Hz Data
ap._remote_station_id = None
kds_24k = ap.create_kernel_dataset(
    local_station_id="9043",
    remote_station_id=None,
    sample_rate=24000
    )
window_size = 1024
window_overlap = 512

config_24k = ap.create_config(
        kds_24k,
        emtf_band_file=band_file_24k,
        num_samples_window=window_size)
config_24k.channel_nomenclature.ex = "e1"
config_24k.channel_nomenclature.ey = "e2"
config_24k.channel_nomenclature.hx = "h1"
config_24k.channel_nomenclature.hy = "h2"
config_24k.channel_nomenclature.hz = "h3"

for decimation in config_24k.decimations:
        # because we are only using a local station need to use the RME estimator.
        decimation.estimator.engine = "RME"
        decimation.window.type = "dpss"
        decimation.window.additional_args = {"alpha": 2.5}
        decimation.output_channels = ["e1", "e2", "h3"]
        decimation.input_channels = ["h1", "h2"]
        decimation.reference_channels = ["h1", "h2"]

        # here is where you would change windowing parameters
        decimation.window.overlap = window_overlap
        decimation.window.num_samples = window_size

        # Save Fourier Coefficents
        decimation.save_fcs = True
        decimation.save_fcs_type = "h5"
2024-11-08T14:18:30.694848-0800 | INFO | mtpy.processing.kernel_dataset | _add_columns | KernelDataset DataFrame needs column fc, adding and setting dtype to <class 'pandas._libs.missing.NAType'>.
2024-11-08T14:18:30.698857-0800 | INFO | mtpy.processing.kernel_dataset | _add_columns | KernelDataset DataFrame needs column remote, adding and setting dtype to <class 'bool'>.
2024-11-08T14:18:30.702847-0800 | INFO | mtpy.processing.kernel_dataset | _add_columns | KernelDataset DataFrame needs column run_dataarray, adding and setting dtype to <class 'NoneType'>.
2024-11-08T14:18:30.705845-0800 | INFO | mtpy.processing.kernel_dataset | _add_columns | KernelDataset DataFrame needs column stft, adding and setting dtype to <class 'NoneType'>.
2024-11-08T14:18:30.707844-0800 | INFO | mtpy.processing.kernel_dataset | _add_columns | KernelDataset DataFrame needs column mth5_obj, adding and setting dtype to <class 'NoneType'>.
150 Hz Data
kds_150 = ap.create_kernel_dataset(
    local_station_id="9043",
    remote_station_id="1003",
    sample_rate=150
    )

config_150 = ap.create_config(kds_150, emtf_band_file=band_file)
config_150.channel_nomenclature.ex = "e1"
config_150.channel_nomenclature.ey = "e2"
config_150.channel_nomenclature.hx = "h1"
config_150.channel_nomenclature.hy = "h2"
config_150.channel_nomenclature.hz = "h3"

for decimation in config_150.decimations:
        decimation.window.type = "dpss"
        decimation.window.additional_args = {"alpha": 2.5}
        decimation.output_channels = ["e1", "e2", "h3"]
        decimation.input_channels = ["h1", "h2"]
        decimation.reference_channels = ["h1", "h2"]

        # here is where you would change windowing parameters
        # decimation.window.overlap = 64
        # decimation.window.num_samples = 128

        # Save Fourier Coefficents
        decimation.save_fcs = True
        decimation.save_fcs_type = "h5"
2024-11-08T14:18:31.063962-0800 | INFO | mtpy.processing.kernel_dataset | _add_columns | KernelDataset DataFrame needs column fc, adding and setting dtype to <class 'pandas._libs.missing.NAType'>.
2024-11-08T14:18:31.063962-0800 | INFO | mtpy.processing.kernel_dataset | _add_columns | KernelDataset DataFrame needs column remote, adding and setting dtype to <class 'bool'>.
2024-11-08T14:18:31.079992-0800 | INFO | mtpy.processing.kernel_dataset | _add_columns | KernelDataset DataFrame needs column run_dataarray, adding and setting dtype to <class 'NoneType'>.
2024-11-08T14:18:31.083357-0800 | INFO | mtpy.processing.kernel_dataset | _add_columns | KernelDataset DataFrame needs column stft, adding and setting dtype to <class 'NoneType'>.
2024-11-08T14:18:31.083357-0800 | INFO | mtpy.processing.kernel_dataset | _add_columns | KernelDataset DataFrame needs column mth5_obj, adding and setting dtype to <class 'NoneType'>.
Pick Runs
With the short bursts, we probably don’t want to process every single one, because there is a lot of redundant information. We can chose from the KernelDataset.df object, which is a Pandas dataframe that tells Aurora which runs to process. Therefore, you can query the dataframe as you like. Here we can pick every second burst.
kds_24k.df = kds_24k.df.iloc[range(0, 20, 2)]
kds_24k.dfSet Run Times
We could also set the start and end time for each run if we wanted. There is a convenience method KernelDataset.set_run_times where you just need to input a dictionary keyed by the run name and then have a start and end time.
For example an input dictionary could be:
run_times_dict = {
    "sr150_0001": {"start":"2024-03-28 14:46:00+00:00", "end":"2024-03-29 10:00:00+00:00"},
}kds_150.dfrun_times_dict = {
"sr150_0001": {"start":"2024-03-28 14:46:00+00:00", "end":"2024-03-29 10:00:00+00:00"},
}
kds_150.set_run_times(run_times_dict)kds_150.dfCreate Processing Dictionary
Now that we have created unique objects for each sample rate, we need to aggregate these into a dictionary that can be input into AuroraProcessing
processing_dict = {
    150: {"config": config_150, "kernel_dataset": kds_150},
    24000: {"config": config_24k, "kernel_dataset": kds_24k}
    }
Process Data
This will the various sample rates, create a transfer function for each and then merge them according to the merge_dict.
tf_processed = ap.process(processing_dict=processing_dict)Processed Data
Now the data have processed and we can have a look at the results.
First have a look at what the out put is. It is a dictionary with keys as the sample rate and values as more dictionaries with information on if the sample rate was properly processed and if it was the transfer function as an mtpy.MT object.
Notice that there are 3 entries in the dictionary with one for "combined" which is the combined transfer function of the various sample rates you processed.
tf_processed{150: {'processed': True,
'tf': TF( survey='MIST', station='9043', latitude=33.05, longitude=-115.98, elevation=-47.76 )},
24000: {'processed': True,
'tf': TF( survey='MIST', station='9043', latitude=33.05, longitude=-115.98, elevation=-47.76 )},
'combined': {'processed': True,
'tf': TF( survey='MIST', station='9043', latitude=33.05, longitude=-115.98, elevation=-47.76 )}}Plot The Combined Response
Now lets plot the response. Including all 4 components and the induction vectors.
tf_processed["combined"]["tf"].plot_mt_response(plot_num=2)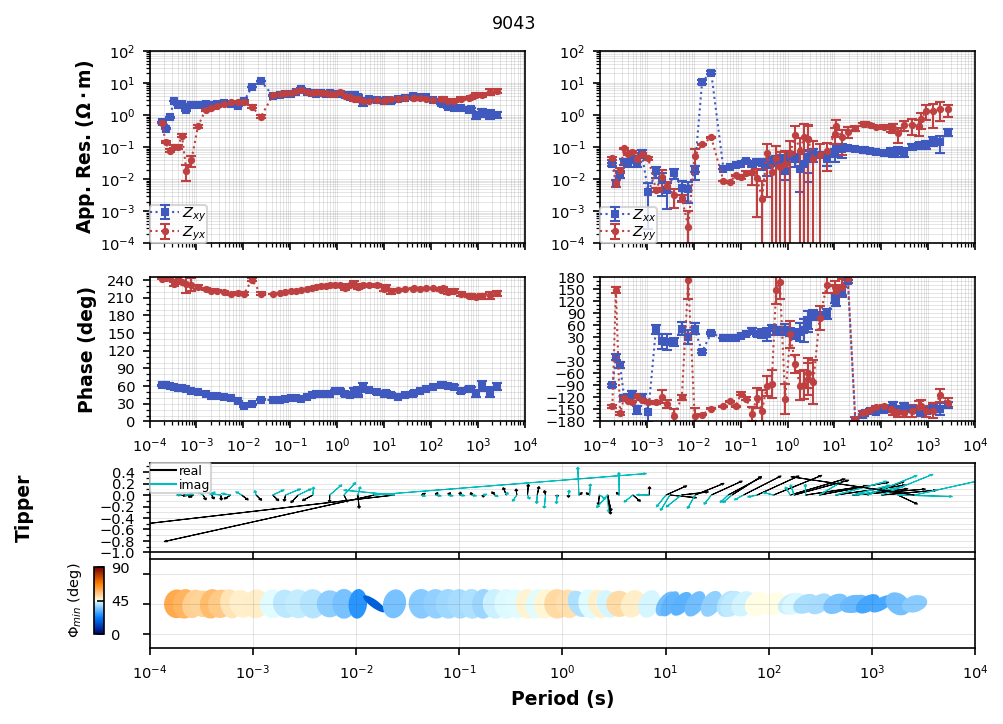
Plotting PlotMTResponseUh-oh
Looks like there was a flipped channel. Which one do you think it was?
We can flip the channel in the transfer function by using flip_phase.
tf_processed["combined"]["tf"].flip_phase(zyx=True, zyy=True, tzy=True, inplace=True)tf_processed["combined"]["tf"].plot_mt_response(plot_num=2)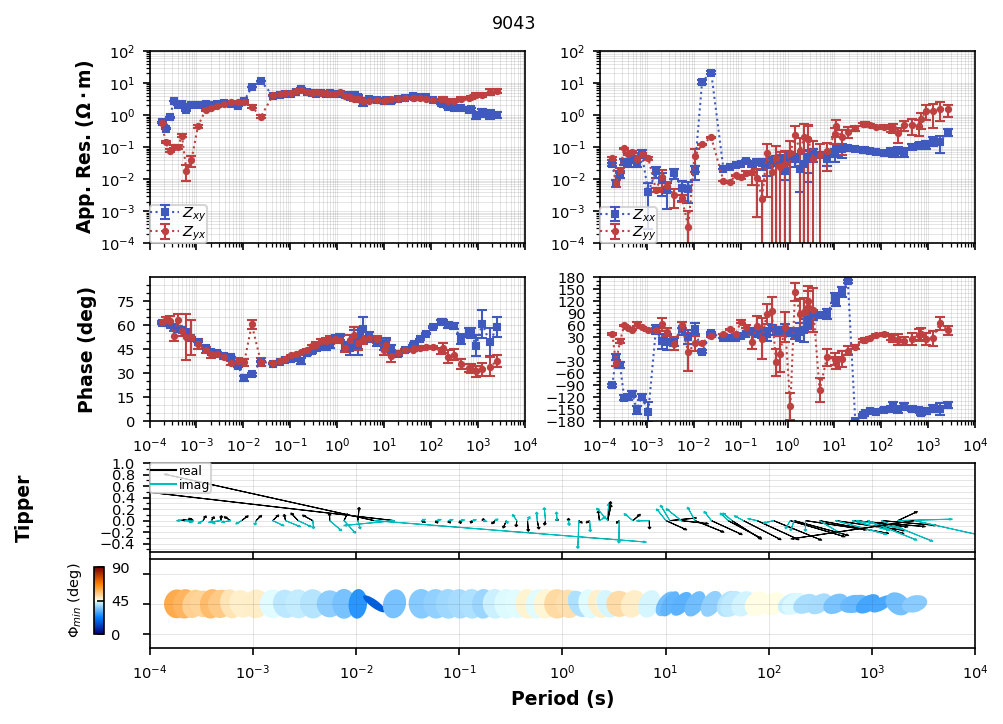
Plotting PlotMTResponseWrite to file
By default AuroraProcessing will write the transfer functions to the station MTH5 file. However, not everyone uses MTH5 yet and so you might want to write to a legacy format. You can do that by using the write method of the transfer function object.
edi_obj = tf_processed["combined"]["tf"].write(edi_path.joinpath(f"{ap.local_station_id}_RR_{ap.remote_station_id}.edi"))help(tf_processed["combined"]["tf"].write)Help on method write in module mt_metadata.transfer_functions.core:
write(fn=None, save_dir=None, fn_basename=None, file_type='edi', **kwargs) method of mtpy.core.mt.MT instance
Write an mt file, the supported file types are EDI and XML.
.. todo:: j-files and avg files
:param fn: full path to file to save to
:type fn: :class:`pathlib.Path` or string
:param save_dir: full path save directory
:type save_dir: string
:param fn_basename: name of file with or without extension
:type fn_basename: string
:param file_type: [ 'edi' | 'xml' | "zmm" ]
:type file_type: string
keyword arguments include
:param longitude_format: whether to write longitude as longitude or LONG.
options are 'longitude' or 'LONG', default 'longitude'
:type longitude_format: string
:param latlon_format: format of latitude and longitude in output edi,
degrees minutes seconds ('dms') or decimal
degrees ('dd')
:type latlon_format: string
:returns: full path to file
:rtype: string
:Example: ::
>>> tf_obj.write(file_type='xml')